
")
Our years of experience show that most companies fall into the same traps when producing an explainer video, costing them thousands of dollars and months of extra work. The good news is, your company won’t be one of them. We’ll show you how to sidestep these common pitfalls and create a video that nails your vision on the very first try. By following explainer video best practices, you’ll keep your project on time, on budget, and on point.
An explainer video is unquestionably one of the most popular marketing tools of our time. Just 60–90 seconds can unpack complex ideas, showcase new products, and inspire viewers to take action. Statistics prove it:
The vast majority of viewers watch explainer videos all the way through, making them far more engaging than traditional ads.
Unfortunately, despite their enormous potential, most companies treat explainer production like any other task handing over a generic brief and hoping the result matches their imagination. That approach leads to frustration, unexpected costs, and videos that miss the mark every time.
Creating explainer videos – tips and tricks
You want to commission an explainer video production. It is an important project because you need to talk about a strategic initiative, generate more leads, or implement a new procedure.
You gave the company a general idea and…wait until they hit your vision? This is a serious mistake. One of the 11 most common mistakes made during the production of the explainer.

The chance that the company will hit your vision perfectly is very low. Unless you tell them some details. [1]
That’s why we have created this mini-guide that will help you make your film in a stress-free and organized way.
The 11 tips contained here are based on experience with over 300 projects with several dozen clients. That is why we are convinced that it will be helpful.
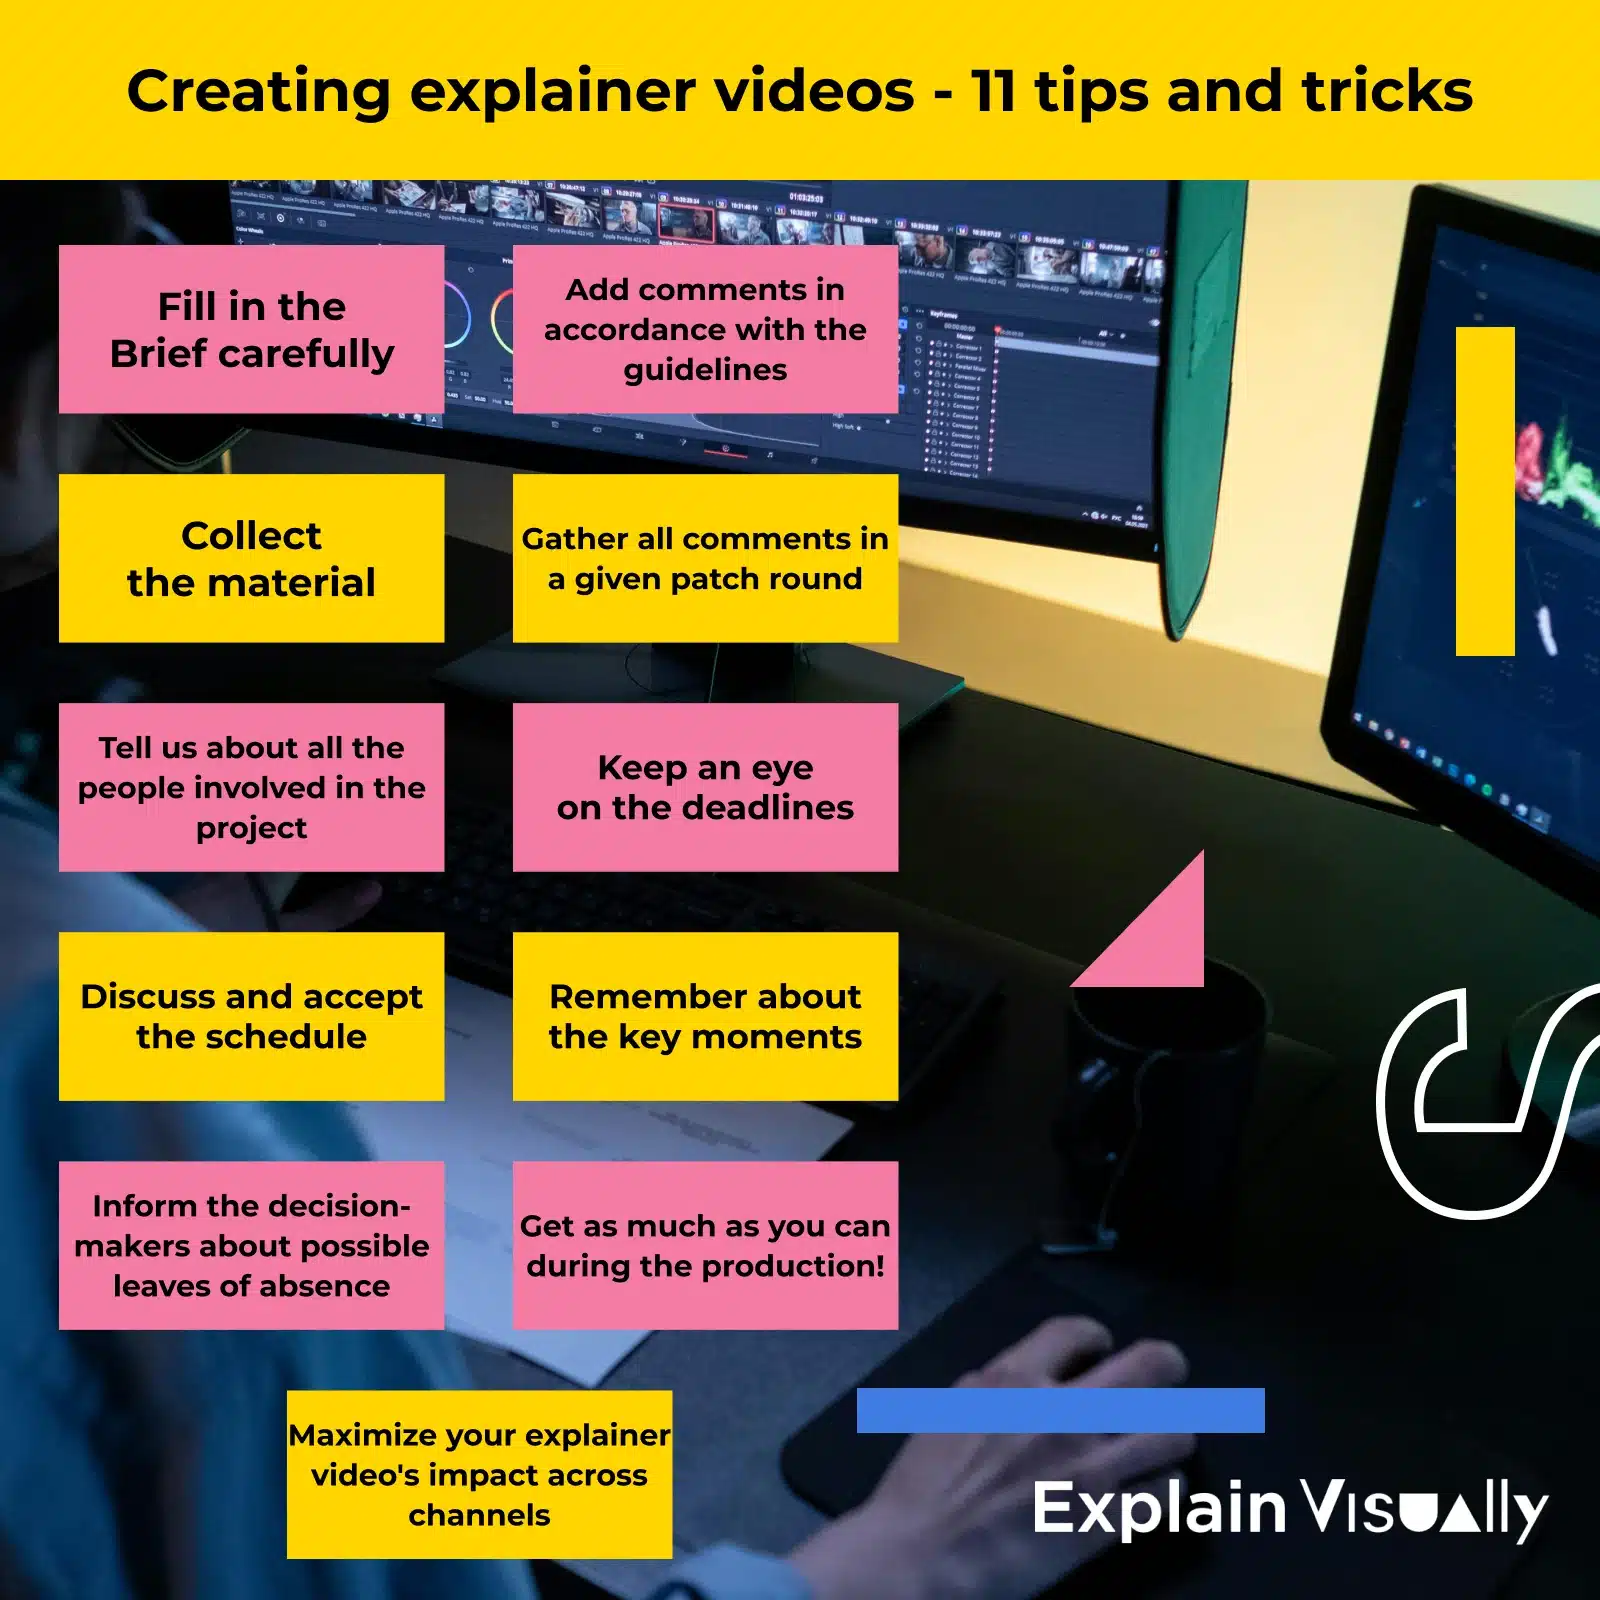
#1: Fill in the Brief carefully
Imagine going to the tailor, and telling him that we want a “blue dress.” He will immediately start asking—but what kind? After all, the dress can be short, long, tight, loose, elegant, or sporty.
The more precisely we tell you what goal we want to achieve, what occasion, what we like, and what to avoid, the more accurate his design will be.

Just like there are many kinds of dresses, there are many kinds of explainer video. The accuracy of the result depends on how precisely we define and describe our goal and vision.
The same goes for the production of the explainer video.
The carefully filled Brief collects information about the goal, the context of the project, the target group, the deadlines or examples, and anti-experiences.When creating explainer videos, your Brief should clearly define your core message and identify your specific audience from the very beginning. This foundational step determines whether you’ll create compelling content that drives viewer engagement or miss the mark entirely.
Your Brief should also specify the video length you’re targeting. We advise you👇:
Research shows that most effective explainer videos perform best between 60-90 seconds, with the first 5 seconds being crucial for capturing your audience’s attention.
In our case, this is a slightly different Brief than usual.
Based on our experience, we created our own Brief, especially for animations.
We send it to clients during the first conversation. If you would like to talk to us about the production, click here.
#2: Collect the material
Although it is the agency that usually realizes the script, it is empty, and even Solomon could not pour from it.
That is why we need information about your project or product to produce an explainer video. They do not have to be nice or interestingly presented—the key is the territory, the so-called “meat.”
Most often the customer sends it in the form of PowerPoint presentations, brochures, or links to websites.

To produce an explainer video you need information about your company, product, or service.
The scripting process becomes significantly more effective when you provide comprehensive background material about your product or service. Think of this as building a foundation for visual storytelling – the more context we have about your customer journey and pain points, the better we can craft a compelling story that resonates with potential customers.
During this material collection phase, it’s also worth gathering any existing brand guidelines, previous marketing materials, and examples of video content that aligns with your brand’s personality. This helps ensure brand recognition and maintains consistency across all your video production efforts. Applying explainer video best practices during this step guarantees every asset drives a unified, on-brand story.
#3: Tell us about all the people involved in the project
Nothing delays the realization of the explainer video (and increases its cost) as much as a decision-maker who at the last stage joins the project and wants to change everything.
That’s why it’s important to know in advance who will want to take part in the animation work.
To be clear, sometimes the CEO is involved in the project, but it’s hard for him to find even a moment to peek at it during the course.
If this is the case, then you can prepare for it. For example, by producing an introductory and slightly less time-consuming version of the film, or adding a few days in the schedule for his comments.
Successful explainer video production requires clear communication channels and defined approval processes from day one. When production begins, having all stakeholders identified prevents costly revisions that can derail your marketing strategy and timeline.
#4: Discuss and accept the schedule
The realization of the project usually looks like it takes a few days for the first draft of the second stage (e.g. storyboard) after the acceptance of a given stage (e.g. a script). This means that comments are needed every 2–3–4 days.
You can see all the specific steps of creating the explainer video here: production of an explainer video
Since there are a lot of steps, you should prepare a schedule.
The project schedule helps both parties to book time in the windows where the materials will appear. It is important to think through this schedule, make changes if necessary, ultimately accept it and try to keep it.
Creating explainer videos involves multiple production processes, each requiring specific timeframes for optimal results. Your explainer video company should provide a detailed timeline that accounts for script development, storyboard creation, animation style selection, voiceover recording, and post-production phases.
The schedule can take a different form, we usually send it as a table in Excel or Google Sheets.

Sample project schedule
#5: Inform the decision-makers about possible leaves of absence
When scheduling on specific dates, we may discover that there is a holiday or someone else’s vacation. If we create a project schedule for four weeks and it turns out that the decision-maker will not be there for three of them, then we have to arrange it differently.
Such knowledge facilitates a realistic assessment of working time and finding a solution—e.g. sending a final version of each stage to the decision-maker so that he can take a look at it during the vacation.
#6: Add comments in accordance with the guidelines
Usually, animations are made in an iterative mode. This means that first, we have Version no. 1, we apply feedback, Version no. 2 is created, we apply feedback…and then usually to Version no. 3.
It means that a lot of comments are exchanged during production. If a part is given by e-mail, a part by phone, and a part in Word, then the risk of missing something along the way increases. Therefore it is important to collect comments in one place.
If you will have comments on a script or storyboard to give, it is good to do it directly on the file. Most often this means comments in Word. Consistently annotating right on the document exemplifies explainer video best practices, streamlining feedback and preventing miscommunication.

An example of a comment in a storyboard in Word
If these are comments on the finished film, it will be the easiest to pass them on using the so-called verb. That is the exact minute and second of the movie in which you want to make a change.
When reviewing your animated video, provide timestamps for specific feedback – for example, “At 0:23, the transition feels too fast” or “The music track at 1:15 doesn’t match the tone”. This precision helps maintain momentum in your video production workflow and ensures your explainer video content stays aligned with your vision.
Then we avoid misunderstandings from the cycle:
– Change this illustration, so green.
– But which one is five of them.
– The one at the beginning.
– From the first scene?
– Oh, yes, it is green there, too. The second one.

Sample comments to the animation
#7: Gather all comments in a given patch round
Introducing changes requires work and time.
That is why it is important to collect them all at once.
Imagine that we have 10 comments and each of them is given separately, one day apart. This means that it will take at least 10 days to implement them. It is much better if all 10 comments are given at once.
And what about the situation when we sleep with it and a new script idea comes up in the morning? Or when our wife watches the material and notices one thing to improve?
It can be planned so that we don’t break the correction turmoil.
How? It’s good to think in advance about who we want to show the film to and then go to those people for comments. And if we need to sleep with the ideas, it will usually be better to wait one day and send the final comments after waking up (unless the deadline is tomorrow :)).
Effective explainer video production requires structured feedback cycles to keep viewers engaged with the final result. Consider creating a checklist of internal reviewers and allocate specific time windows for comprehensive review sessions rather than scattered individual comments.
#8: Keep an eye on the deadlines
Agencies usually carry out several projects simultaneously. This requires good coordination.
If you send comments with a delay, there is a risk that the team has already taken care of another project and has to finish it before it returns to yours.
That is why submitting comments on time is so important.
Of course, life writes different scenarios—sometimes there are delays for reasons beyond our control. Agencies do, too. In such a situation it is important to communicate with each other and tell them what will delay us, and what/how much we intend to do about it.

Creating a schedule and keeping to it avoids delays in the production of the explainer video.
#9: Remember about the key moments
The two most important moments in production are
- Filling in Brief
Because the film is made on this basis. We wrote more about it in point #1.
- Acceptance of the storyboard
Because this is the exact plan of making this film.
Imagine that after watching the first version of Star Wars, George Lucas says that Darth Vader should have not have a black outfit but a white one. This would require the whole movie to be shot again and would generate significant costs for equipment, people, and so on.
Similarly — although on a much smaller scale in terms of time and money, of course — is the case with changes in the animation. That’s why it’s crucial for both parties at the storyboard stage to be sure that they want to implement the concept contained in it.
The storyboard approval stage is where your visual storytelling approach gets locked in. This is your last opportunity to ensure the animation style, visual style, and overall narrative structure will effectively communicate complex ideas to your right audience. Once you move beyond storyboard approval, major changes become exponentially more expensive and time-consuming. Confirming every detail at this stage embodies explainer video best practices, safeguarding your budget and timeline against costly rework.

An example of a storyboard
#10: Get as much as you can during the production
Often the production of an explainer video is an opportunity to rethink products or projects. Employees hearing someone from outside talk about their company’s activities often start to look at their work freshly and generate new ideas.
The production of an explainer video also gives an impulse for talks between departments. During the production of the video and talks with the agency, they can establish a coherent narrative about the product, project, or procedure.
The collaborative process of creating explainer videos often yields valuable insights that extend beyond the final video itself. Many of our clients discover new ways to articulate their value proposition or identify previously overlooked customer pain points during the development process. This enhanced understanding of their own offering often improves their broader marketing strategy and customer interactions.
#11: Use your explainer video wherever you can
A film hidden in a drawer will not do much good. There are many options to use it, some of which you can find on our website in “Knowledge database“.
Your marketing strategy should include plans for distributing your explainer video across multiple touchpoints in the customer journey. Consider how the video will perform on your landing page, social media platforms, email campaigns, and during customer interactions.
Different platforms may require different video lengths and formats – what works as a 90-second explainer video on your website might need to be edited into short form animated explainer videos for social media to maximize viewer engagement. Each platform has its own explainer video best practices for encouraging viewers to take action.
Master the fundamentals of great explainer video content
Creating videos that truly connect with your target audience requires understanding several explainer video best practices that go beyond just project management.
Script and narrative excellence
Your script is the foundation of any good explainer video. Start with a compelling hook within the first 5 seconds – this could be a surprising statistic, a relatable pain point, or a thought-provoking question that immediately captures your audience’s attention.
Follow the proven problem-solution-action structure: identify your audience’s pain points, present your product or service as the solution, and end with a clear call to action. Keep your language conversational and avoid too much jargon – your goal is enhanced understanding, not showcasing technical expertise.
Checklist for script development:
- Hook established within first 5 seconds.
- Problem clearly identified and relatable to target audience.
- Solution presented as logical response to problem.
- Benefits highlighted over features.
- Strong call to action included.
- Script length appropriate for 60-90 second final video.
Animation style and visual design
Your animation style should reflect your brand identity while serving the functional purpose of explaining complex concepts. Whether you choose whiteboard animation for its engaging, hand-drawn feel, or high quality animation with sophisticated motion graphics, consistency is crucial for brand recognition.
It is the first animation we created for Suntech.
Visual storytelling works best when every element serves the narrative. Use visual aids strategically – they should simplify abstract ideas rather than add unnecessary details that could distract from your core message.
And for comparison, this is the second animation we created for Suntech.
Animation style considerations:
- Brand consistency across all visual elements.
- Animation techniques that enhance rather than distract from message.
- Motion principles that reflect brand’s personality.
- Visual hierarchy that guides audience’s attention to important information.
Sound design and audio excellence
Audio quality can make or break your explainer video – poor sound design immediately signals unprofessionalism and reduces viewer engagement. Choose music tracks that complement your brand’s personality without overpowering the narration.
Professional voiceover delivery should maintain a conversational tone that builds trust with potential customers. The right music and sound effects can create emotional connection and enhance the overall viewing experience.
Audio production checklist:
- Professional voiceover that matches brand tone.
- Background music that enhances without overwhelming.
- Clear audio mixing with no distracting background noise.
- Sound effects used strategically to support visual storytelling.
Our commitment to explainer video best practices
As Explain Visually, we don’t just recommend these practices – we live by them in every project we undertake. Our proven track record with over 480 companies demonstrates that following these explainer video best practices consistently delivers results.
We’ve helped clients achieve remarkable outcomes, including a 22,486% ROI for one client who secured $1M funding partly thanks to their explainer video, and helped another generate B2B leads 10 times cheaper than their previous methods. These results come from applying the same systematic approach outlined in this guide to every explainer video production we undertake. See our extensive portfolio.
Our explainer videos:
